Targeting Continued - a practical application. One of the most important tasks of training is controlling your dog's movement from a distance.
Whether your interest is competition obedience, agility, search and rescue, field trials, or finding a Frisbee in high grass, using your dog's new skill at targeting can make directed movements a snap. If you have been keeping up with the assignments, your dog should be comfortable with this sequence -- moving away from you, bumping one of your arrow targets and returning. This basic pattern is the
key to making your dog's movements predictable and thereby controllable. To start this month's project, gather your clicker, treats, target arrows and of course, your dog. Select a relatively quiet
outdoor where you can work off lead safely. First, place a target arrow in the ground and move about five feet away from it. Sit your dog facing the
target and stand slightly to the side. Point at the target and say "Touch" After all your practice last month, your dog should blast over to the target and touch the ball - click and treat.
NOTE: If you don't get this reaction on the first try, drop your standards and allow your dog to succeed at a shorter distance a few times. If you have been working on other things, go back and
review last month's exercises and gradually build up to a short go-out. Once you have achieved your simple go-out, repeat the sequence about 10 times, quickly. To make it
a bit more interesting, take a step or two to one side or the other as the dog is moving away from you. This will insure that he must actually look to see where you are on the return. Your goal, for now, is to
create a pattern that the dog can repeat almost without thinking about it. ADDING A WORKING CUE:
At this stage of the behavior, a command would help to initiate each repetition. Since the behavior is currently a pretty poor example of the end product, it's a good idea not to attach the cue you
eventually want to use in competition -- we will go into detail about this, next month, so for the moment, trust me on this. For the moment, we are going to add a "working cue", that will allow you to
trigger the current version of the behavior. Attaching the working cue:
Attaching a cue to a regularly occurring behavior is really easy. All you have to do it change the pattern
a little bit. This time, just after you click and treat for a successful repetition, say "go" , "out"± or
whatever cue you prefer, just before you think the dog is ready to go out to the target. Here's what the new pattern looks like ---
1. Wait until a pause occurs between the click and treat of one repetition and the start of another.
2. During the pause, say the command word in a normal tone of voice - well before the next repetition starts. (It is important to realize that you are attaching an initially meaningless word to a new behavior.
For 20-50 repetitions, the word is not "causing" the behavior to happen. It is the learning of the pattern that will allow the dog to connect the cue to the behavior. The more consistent you are with the
20-50 repetitions, the faster the dog will learn the cue. ) 3. The dog does the behavior. 4. Click and Treat 5. Repeat the sequence, starting at Step 1.
For those of you who are just starting out with clicker training, this process of adding the cue AFTER establishing the behavior may feel a little odd. For the time being, try to ignore the uncomfortable
feeling and simply work through the exercises. Concentrate on making the pattern so precise that the dog will learn it quickly. "Big T, Little t"
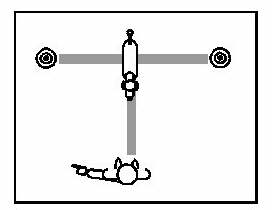
Once your dog will consistently "go-out" to the target, it is time to add left and right to the process. The
easiest way to do this is to sit your dog in the same position you used for your "go-out" and change
your position. If you imagine the shape of a big "T", you can easily visualize the new setting. The dog
will be at either end of the cross bar - the choice of which one to start with is up to you. The target is on the other end to the cross bar, and you are at the base of the "T".
From the base of the "T", point generally in the direction of the target - but don't point directly at the
target. Give your cue for "go-out". There may be a bit of confusion for a second, but if you have worked up to this gradually, the dog should blast over and touch the target. If she fails, drop your
standards and get the behavior happening on a shorter cycle - like every 5 seconds, or so. Then try the new scenario again.
Once you have consistent performance on one end of the "T", move your position so that the dog is seated at the other end of the cross bar. It isn't necessary to move the target, just move the dog and
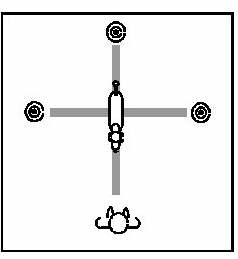
yourself. Run this exercise about 20 times, so that you are getting consistent performance from the dog. Now that we have the movement to either side, it's time to start making it a little more complicated. Now get a second target, and place one on each end of the cross bar. Sit the dog in the center of the
cross bar and stand at the base of the "Big T". Use your arm signals and verbal cues to get the dog to
go to either target. Remember to use "wrong" at the instant the dog heads in the wrong direction. When you are getting consistent responses, add a third target, about 10 feet past the center position.
This will make our setup look like a "Little t", instead of a "Big T". Now you can send the dog away
from you with your cue for "go-out". Practice this "round robin" until the dog's performance is smooth.
You can add more arrows in order to increase the complexity and require more directed movements in between reinforcements.
Once you feel very confident that the dog knows the basic behaviors, you will need to know how to remove the targets. For some of you, this will be within a couple of training sessions, while others may
choose to wait for several weeks. My best advice is don't be in a hurry to pull off the training wheels until the kid really knows how to ride the bike. Pulling the target: Until you can remove the targets the dog really doesn't know how to do the final behavior. The easiest
way to accomplish this is to get the dog to make a simple mistake. First, start a practice session using
your "Little t" setup. Make sure that the pace is pretty quick. After about ten successful movements,
give the dog signals that places her at the far end of any of the arms of the "T." This is the moment of
truth -- give the signal that will take the dog in a direction where there is no target. If the dog balks, say "Wrong" and go back to practicing, with special care to build up the speed and the number of
targets the dog can bump, successfully. Once the rate of performing is back up to speed, try the "setup" again. Move the dog to the far end of
one of the arms of the "t" and give the signal that would take her to an area where there is no target. If
the dog takes the tiniest step in the correct direction, click and treat - stop the session for a second and
really whoop it up. Go back to your training diagram and slip in some of the "go to the target that isn't
there" situations. If you stick with "Wrong" for turn-backs and clicks and treats for continuing in line,
you can build a 10 yard go-out (with no targets) in a couple of sessions. Now remove all the targets and practice your "Big T - Little t" training without the targets.
Over a series of sessions, these exercises will give your dog the skills necessary to move quickly at your direction. One of the easiest ways to start using these directional signals is to place jumps in line
with the targets - this will accustom the dog to taking obstacles after you give a direction signal. Once the dog is flawless with the process, it will be time to add a performance cue to each of these
movements - and that is part of next month's topic.
Go to the next article | Go to Prior Article Home | Top | Seminars | Articles | Clicker Training | Go Shopping! | E-mail to us! Copyright 1998 by Gary Wilkes -- No portion of this web page may be reproduced without permission. |